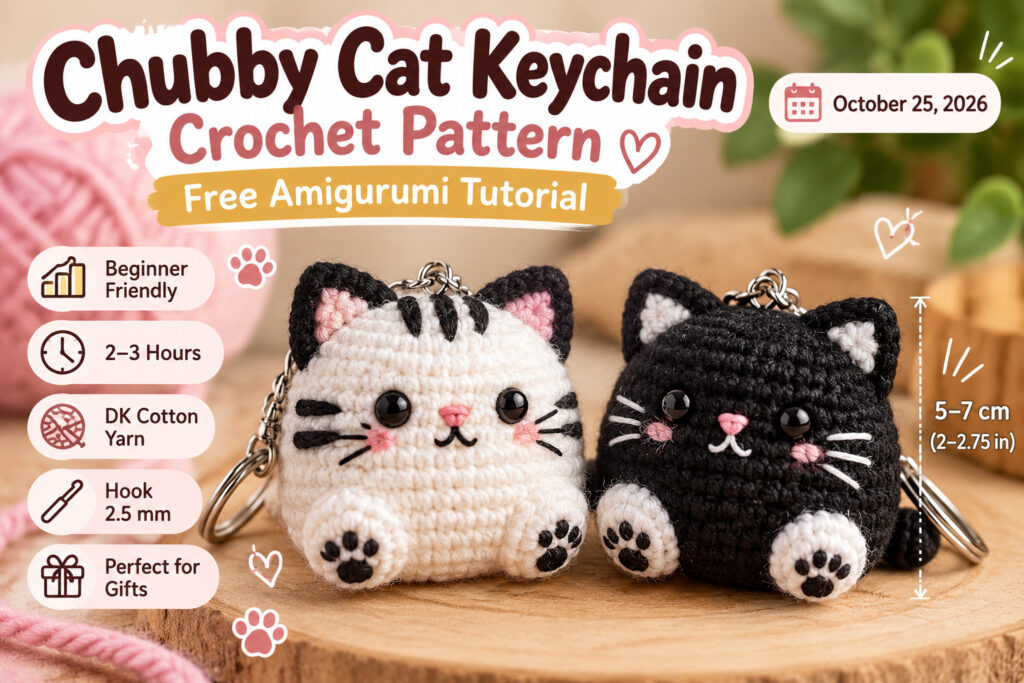
Have you ever seen a tiny handmade cat and immediately wanted to make one yourself? This chubby cat keychain is a sweet little crochet project with a rounded body, pointed ears, tiny paws, and an adorable embroidered face. It is small enough to attach to your keys, backpack, purse, or even use as a handmade gift for someone who loves cats.
The best part is that you can customize your little kitty in almost any color. Make a classic black cat, a soft cream kitten, a gray tabby-inspired charm, or a playful black-and-white cat with contrasting paws and facial details.
In this tutorial, I’ll walk you through the materials, crochet abbreviations, step-by-step instructions, and finishing tips to help you create your own miniature amigurumi cat keychain.
Chubby Cat Keychain Crochet Pattern at a Glance
- Skill level: Beginner-friendly
- Project type: Amigurumi keychain
- Finished size: Approximately 5–7 cm (2–2.75 inches), excluding the keychain hardware
- Estimated time: 1.5–3 hours
- Yarn: Lightweight cotton or cotton-blend yarn
- Crochet hook: 2–2.5 mm, depending on your yarn and tension
- Construction: Crocheted body, separate ears and tail, embroidered face
- Special techniques: Magic ring, single crochet, increases, decreases, and sewing small pieces together
The finished size may vary depending on your yarn, hook, and personal tension.
Related : Easy Crochet Christmas Tree Ornament – Free Beginner Pattern
Why You’ll Love This Crochet Cat Keychain
There is something special about making a tiny crochet animal. You don’t need a large amount of yarn, and you can finish a small project without committing to a complicated pattern that takes several days.
This little cat is a lovely choice for beginners who want to practice working in continuous rounds. The rounded body is simple, while the pointed ears and embroidered face give it that unmistakable kitten look.
You can also make several cats in different colors and turn them into matching bag charms, party favors, stocking stuffers, or small handmade gifts.
If you enjoy making miniature animals, this project is a great starting point for exploring other amigurumi designs.
Materials and Supplies
Before starting your chubby cat keychain, gather the following supplies.
- Yarn: A small amount of DK or sport-weight cotton yarn in your preferred color.
- Crochet hook: A 2–2.5 mm hook, adjusted to create tight stitches.
- Stuffing: A small amount of polyester fiberfill.
- Embroidery thread: Black yarn for the eyes, nose, mouth, and whiskers.
- Yarn needle: For sewing the ears and tail and weaving in loose ends.
- Stitch marker: To keep track of the beginning of each round.
- Scissors: For trimming yarn.
- Keychain ring: A small metal ring or clasp for attaching your finished cat to keys or a bag.
Cotton yarn is a good choice because it produces defined stitches and helps the little cat hold its shape. Choose a hook that makes the fabric dense enough to prevent stuffing from showing through.
Crochet Abbreviations
This pattern uses standard US crochet terminology.
| Abbreviation | Meaning |
|---|---|
| MR | Magic ring |
| ch | Chain |
| sc | Single crochet |
| inc | Increase: 2 sc in the same stitch |
| dec | Decrease: crochet 2 stitches together |
| sl st | Slip stitch |
| st(s) | Stitch(es) |
| FO | Fasten off |
| Rnd | Round |
Important: Work in continuous spirals unless instructed otherwise. Do not join each round with a slip stitch. Use a stitch marker to identify the first stitch of every round.
Step 1: Crochet the Cat’s Body and Head
The body and head are worked as one rounded piece, so there is no separate neck to sew together. This keeps the design simple and gives the finished cat a soft, chubby appearance.
Using your main yarn color, begin with a magic ring.
Round 1: Make 6 sc into the magic ring. (6)
Round 2: Inc in every stitch around. (12)
Round 3: Repeat (1 sc, inc) around. (18)
Round 4: Repeat (2 sc, inc) around. (24)
Rounds 5–9: Sc in every stitch around. (24)
Round 10: Repeat (2 sc, dec) around. (18)
Round 11: Sc in every stitch around. (18)
Round 12: Repeat (1 sc, dec) around. (12)
Begin adding small amounts of stuffing. Distribute it evenly and gently shape the body with your fingers.
Round 13: Dec around. (6)
Fasten off, leaving a yarn tail. Thread the tail through the front loops of the remaining stitches and pull gently to close the opening. Weave in the end securely.
Take a moment to shape the body before moving on. The piece should look rounded rather than long and narrow.
Step 2: Make Two Pointed Cat Ears
The pointed ears are one of the most important details of this project. They help distinguish your little kitty from a round amigurumi bear.
Make two ears using the same yarn as the body.
Round 1: Make 4 sc into a magic ring. (4)
Round 2: Inc in every stitch around. (8)
Round 3: Sc in every stitch around. (8)
Round 4: Repeat (2 sc, dec) twice. (6)
Fasten off, leaving a long tail for sewing.
Flatten each ear gently between your fingers. The final decrease round helps shape the tip, while the wider base makes it easier to attach the ear to the body.
If you prefer a softer kitten appearance, you can use a contrasting yarn color for the inner ears when embroidering the finished piece.
Step 3: Crochet the Tiny Tail
A little tail gives the cat extra personality without adding much work.
Using your main yarn color:
- Ch 10.
- Starting in the second chain from the hook, make 9 sl st across.
- Fasten off, leaving a long tail for sewing.
The result is a slim, flexible tail that can be attached in a gentle curve.
If you want a longer tail, add a few more chains. For a shorter, curled appearance, use fewer chains and shape it carefully when sewing it onto the body.
Step 4: Add the Cat’s Tiny Paws
For a simple design, you can embroider small paw details near the bottom of the body instead of making separate legs. This keeps the finished keychain compact and reduces the number of pieces you need to sew.
Using black, cream, or a contrasting yarn color, make two or three short stitches on each lower side of the body to suggest tiny paws.
For a more three-dimensional look, you can create two small crocheted ovals separately and sew them to the lower front of the body. Pin them in place first to check that both sides look balanced.
Keep the details small. On a miniature amigurumi, a few neat stitches can make a bigger difference than lots of decoration.
Step 5: Embroider the Cat’s Face
This is the step where your little cat really comes to life.
Use black embroidery thread or a thin strand of yarn to add the facial details.
Eyes: Embroider two small eyes on the front of the body, leaving a few stitches between them. Check their placement from the front before securing the yarn.
Nose: Make a tiny triangular or horizontal stitch between and slightly below the eyes.
Mouth: Add a short vertical stitch beneath the nose, followed by two small diagonal stitches to create a subtle smile.
Whiskers: If you like, add two short lines on each side of the nose.
Because this is a very small project, embroidered eyes are a good option when you want to avoid loose small components. They also make the cat suitable for a wider range of decorative uses.
Take your time with the face. A slightly serious expression, sleepy eyes, or a tiny smile can give each cat a completely different personality.
Step 6: Assemble Your Chubby Cat
Now it’s time to put everything together.
- Position the two ears on the top of the body, leaving enough space between them for a balanced face.
- Pin the ears temporarily and check their placement from the front.
- Sew the ears securely using the yarn tails.
- Attach the tail to the lower back of the body, slightly to one side if you prefer a playful look.
- Check that the embroidered face is centered and that the paws are evenly positioned.
- Weave in any remaining loose ends and trim excess yarn.
Before attaching the keychain hardware, gently check all sewn parts and make sure the body holds its shape.
Step 7: Attach the Keychain Ring
To turn your amigurumi cat into a functional keychain, you need a secure attachment point.
You can use a small metal keychain ring, a lobster clasp, or a short chain designed for bag charms.
Position the attachment at the top center of the body. Depending on the hardware, you can use a small crocheted loop or a securely sewn yarn loop to connect the cat to the ring.
Pull gently on the attachment to check that it stays in place. Avoid relying on a single loose stitch, especially if the keychain will be handled frequently.
If you are making the cat for a young child, remember that keychain hardware and small components can present choking hazards. This project is best treated as a decorative accessory rather than a toy for babies or toddlers.
Related : 2 Christmas Cocoa Crochet Patterns: Cute Bear & Mug
Tips for Making a Neat Amigurumi Cat
Small crochet projects can be surprisingly tricky because every stitch and facial detail is visible. These tips can help you achieve a cleaner finish.
Keep Your Stitches Tight
Use a hook small enough to create a dense fabric. If you can see gaps between stitches or stuffing showing through, try a smaller hook.
Count Every Round
A missed increase or decrease can change the shape of the body. Place a stitch marker at the beginning of each round and check your stitch count before continuing.
Add Stuffing Gradually
Use small pieces of stuffing instead of pushing in one large clump. This makes it easier to create a smooth, rounded shape.
Check the Face Before Finishing
Before securing the embroidery, look at the face from a short distance. Make sure the eyes are level and the nose sits in the center.
Secure the Keychain Attachment
A handmade keychain may be pulled, twisted, or caught on other items. Reinforce the attachment point and check it regularly for loose threads or damaged hardware.
Color Ideas for Your Crochet Cat Keychain
One of the nicest things about this pattern is how easily you can customize it.
- Classic black cat: Black yarn with embroidered eyes and a small pink nose.
- White kitten: Cream or white yarn with gray facial details.
- Gray tabby-inspired cat: Light gray yarn with darker embroidered stripes.
- Black-and-white cat: White body with black ears, paws, or small patches.
- Pastel kitten: Soft pink, lavender, or mint yarn for a cute bag charm.
- Calico-inspired cat: Combine cream, orange, and black details for a multicolored appearance.
If you’re making several cats as gifts, try changing only the yarn colors and facial expressions. Small variations can make every finished piece feel unique.
Common Questions About Crochet Cat Keychains
What yarn is best for a crochet cat keychain?
Cotton or cotton-blend yarn is a great option because it creates clear stitches and a firm fabric. Smooth acrylic yarn can also work well. The important thing is to choose a suitable hook size and maintain consistent tension.
Is this crochet cat keychain suitable for beginners?
It is designed for beginners who are comfortable learning basic stitches and working in continuous rounds. If you have never made a magic ring or invisible decrease, practice those techniques before starting the full project.
How long does it take to crochet a tiny cat keychain?
Allow approximately 1.5–3 hours, depending on your experience, sewing speed, and the amount of detail you add. Beginners may need more time for shaping and embroidery.
Can I make the cat bigger?
Yes. You can use thicker yarn and a larger hook to create a larger cat. Remember that the finished size, yarn consumption, and stitch definition will change.
Can I sell finished crochet cats made from this pattern?
You should check the terms attached to the pattern you use and make sure you have the right to sell finished items if any restrictions apply. If you make your own original version, keep your instructions and photographs original and clearly state your own terms for finished products.
How do I keep the cat’s shape?
Use tight, even stitches, add stuffing gradually, and close the final opening securely. Avoid overstuffing, which can stretch the stitches and make the body look uneven.
Final Thoughts
A chubby cat keychain is a small project that can bring a lot of personality to a simple ball of yarn. With its rounded body, pointed ears, tiny paws, and embroidered face, this miniature amigurumi is a lovely way to practice shaping and finishing techniques while creating something useful.
Try different yarn colors, experiment with facial expressions, and make a little collection of cats for your keys, bags, or handmade gifts.
Once you have finished your first kitty, you may find yourself wanting to make another one in a completely different color.
Happy crocheting, and enjoy bringing your tiny yarn cat to life!