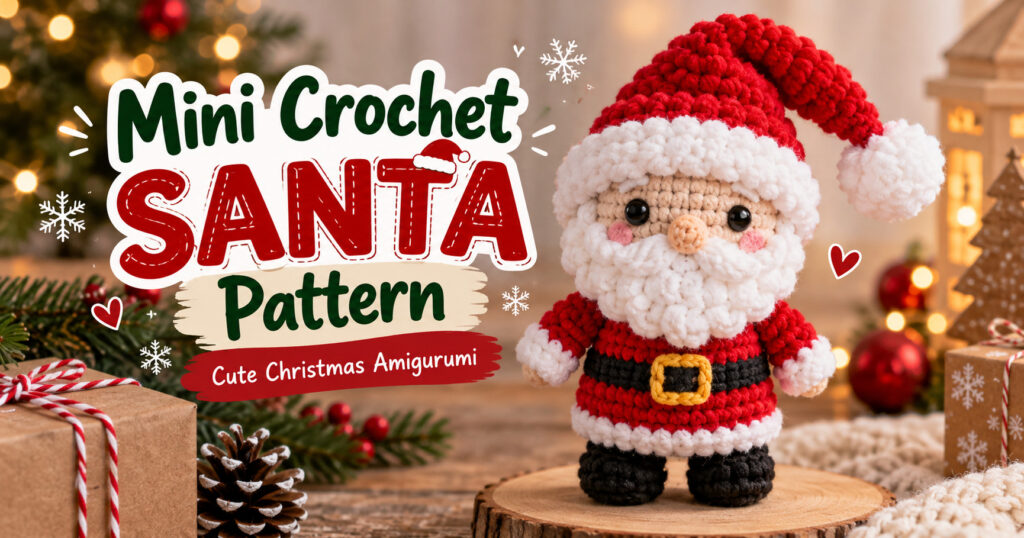
There is something special about making tiny Christmas decorations by hand. A little Santa Claus with a fluffy white beard, a bright red hat, and a cheerful face can bring a festive touch to your home without taking days to complete.
This mini crochet Santa amigurumi is a fun project for the holiday season. You can use it as a Christmas tree ornament, a small handmade gift, a stocking stuffer, or a cute decoration for your desk or mantel.
The pattern uses simple amigurumi techniques, making it a good project for beginners who already know how to make single crochet stitches, increases, and decreases. You can also customize the colors and add little details to give your Santa his own personality.
In this guide, you will find the materials, crochet abbreviations, step-by-step instructions, assembly tips, and ideas for finishing your mini Santa.
Mini Crochet Santa Pattern at a Glance
- Project: Mini Santa Claus amigurumi
- Skill level: Beginner-friendly with basic crochet experience
- Estimated finished size: Approximately 8–12 cm (3–5 inches), depending on yarn and tension
- Yarn: Red, white, skin-tone, black, and a small amount of yellow or gold
- Hook: 3–4 mm, depending on your yarn
- Construction: Separate body, head, arms, and hat
- Techniques: Magic ring, single crochet, increases, decreases, and sewing pieces together
- Best uses: Christmas decorations, handmade gifts, and festive displays
Materials You Will Need
Gather your materials before starting so you can focus on making your little Santa.
- Red yarn for Santa’s suit and hat
- White yarn for the beard, hat trim, and pom-pom
- Skin-tone yarn for the face
- Black yarn for the belt and boots
- A small amount of yellow or gold yarn for the buckle
- Crochet hook appropriate for your yarn
- Fiberfill stuffing
- Yarn needle
- Stitch marker
- Scissors
- Two small safety eyes, or black embroidery thread for a child-safe embroidered face
Yarn tip: Chenille or velvet yarn creates a soft, plush Santa, while cotton or acrylic yarn makes it easier to see individual stitches. If you are new to amigurumi, smooth yarn is often easier to work with.
Related : Chubby Cat Keychain Crochet Pattern Free Amigurumi Tutorial
Crochet Abbreviations
This pattern uses standard US crochet terminology.
- MR: Magic ring
- ch: Chain
- sc: Single crochet
- inc: Increase — work 2 single crochet stitches in the same stitch
- dec: Decrease — combine 2 stitches into 1
- sl st: Slip stitch
- FO: Fasten off
- st(s): Stitch(es)
- BLO: Back loop only
Work in continuous rounds unless the instructions say otherwise. Use a stitch marker to mark the beginning of each round.
1. Crochet Santa’s Body
Use red yarn to create the main part of Santa’s suit. Keep your stitches fairly tight so the stuffing does not show through.
Round 1: Make a magic ring and work 6 sc into the ring. (6)
Round 2: Inc in every stitch around. (12)
Round 3: Repeat 1 sc, inc around. (18)
Rounds 4–6: Sc in every stitch around. (18)
Round 7: Repeat 1 sc, dec around. (12)
Add a little stuffing to the body, making sure it stays firm but not overly stretched.
Round 8: Sc in every stitch around. (12)
FO, leaving a long tail for sewing. Add any remaining stuffing before closing the opening if needed.
The body should look like a small rounded Santa suit. You can gently shape it with your fingers before moving on to the head.
2. Make Santa’s Head
Switch to skin-tone yarn for the face.
Round 1: Make a magic ring and work 6 sc into the ring. (6)
Round 2: Inc in every stitch around. (12)
Round 3: Repeat 1 sc, inc around. (18)
Rounds 4–6: Sc in every stitch around. (18)
If you are using safety eyes, place them between rounds 4 and 5, leaving approximately 4–5 stitches between them. Check the placement before securing them.
For a child-safe decoration, embroider the eyes instead of using plastic safety eyes.
Round 7: Repeat 1 sc, dec around. (12)
Stuff the head lightly but firmly.
Round 8: Dec around. (6)
FO and close the remaining opening. Leave a yarn tail if you need it to sew the head onto the body.
Position the head on top of the red body and sew the two pieces together securely. Keep the face looking forward.
Related : Easy Crochet Christmas Tree Ornament – Free Beginner Pattern
3. Crochet Santa’s White Beard
The fluffy white beard is one of the details that makes this little Santa instantly recognizable.
With white yarn, make a small oval beard that fits over the lower half of the face.
Foundation: Ch 7.
Row 1: Starting in the second chain from the hook, work 6 sc. Ch 1 and turn. (6)
Row 2: Inc, 4 sc, inc. Ch 1 and turn. (8)
Row 3: Sc across. Ch 1 and turn. (8)
Row 4: Dec, 4 sc, dec. (6)
FO and leave a long sewing tail.
This creates a simple rounded beard. If you want a fuller, more traditional Santa beard, add a few short strands of white yarn along the lower edge, or use soft white yarn and gently brush it out if the fiber type allows it.
Place the beard below the eyes, leaving enough space for the nose. Sew it in place with small, neat stitches.
Add a Tiny Nose
With skin-tone yarn, make a small nose using a few stitches or a tiny stuffed piece.
For a very simple version, embroider a short horizontal stitch in the center of the face, just above the beard. Keep it small so it does not cover the beard or eyes.
4. Make Santa’s Arms
Make two arms using red yarn.
Round 1: Make a magic ring and work 6 sc into it. (6)
Rounds 2–6: Sc in every stitch around. (6)
FO, leaving a long tail for sewing.
You can add a tiny white cuff to each arm by sewing a few white stitches around the opening. Leave the arms unstuffed or add just a small amount of fiberfill to keep them flexible.
Sew one arm to each side of the body. Angle them slightly forward if you want Santa to look as though he is holding a little gift.
5. Crochet Santa’s Hat
A tall red hat with a soft white trim completes the Christmas look.
With red yarn:
Round 1: Make a magic ring and work 6 sc into it. (6)
Round 2: Repeat 1 sc, inc around. (9)
Round 3: Sc in every stitch around. (9)
Round 4: Repeat 2 sc, inc around. (12)
Round 5: Sc in every stitch around. (12)
Round 6: Repeat 3 sc, inc around. (15)
Round 7: Sc in every stitch around. (15)
Continue with additional plain rounds if you want a taller hat. Adjust the number of rounds to fit your Santa’s head.
For the white brim, join white yarn at the bottom edge of the hat and work one round of sc. If you prefer a thicker trim, add a second round.
To make the pom-pom, use white yarn to create a tiny ball with a magic ring and 6 sc, then close it and sew it to the tip of the hat.
Sew the hat onto Santa’s head, tilting it slightly to one side for a playful look.
6. Add the Black Belt and Tiny Buckle
Santa’s black belt adds contrast to the red suit.
Cut a length of black yarn and wrap it around the body at waist level. Secure it with a few small stitches at the back.
For the buckle, use yellow or gold yarn to embroider a small square on the front of the belt. A few neat stitches are enough to suggest the shape without making the detail too bulky.
If your body is too small for a separate belt, simply embroider a horizontal black line and a tiny gold square on the front.
7. Assemble and Finish Your Mini Santa
Before finishing, take a moment to check that all the pieces are securely attached.
- Make sure the head is centered on the body.
- Check that the beard sits neatly below the eyes.
- Adjust the hat so it covers the top of the head without hiding the face.
- Position the arms evenly on both sides.
- Secure the belt and buckle.
- Weave in all loose yarn ends with a yarn needle.
Gently shape the finished Santa with your fingers. Avoid pulling too hard on the beard, arms, or hat.
If you plan to hang your Santa on a Christmas tree, sew a loop of yarn securely through the top of the hat. Test the loop before hanging the ornament.
Tips for the Best Results
Keep Your Stitches Tight
Amigurumi looks neater when the stitches are tight enough to hide the stuffing. If you can see the fiberfill between stitches, try a smaller crochet hook.
Choose the Right Yarn
Smooth cotton or acrylic yarn makes the facial details easier to control. Chenille yarn creates a softer, plush finish but can make it harder to count stitches.
Use Stitch Markers
Small projects can be surprisingly easy to lose track of, especially when working in continuous rounds. A stitch marker helps you keep the correct stitch count.
Check the Proportions Before Sewing
Place the head, beard, arms, and hat together before attaching everything permanently. This gives you a chance to adjust their positions while the pieces are still easy to move.
Make Each Santa Unique
Try a green suit, a cream-colored beard, or a striped hat. You can also add a tiny crochet gift, a scarf, or a small embroidered star to create a different Christmas character.
Creative Ways to Use Your Crochet Santa
Once your mini Santa is finished, there are several ways to enjoy your handmade creation.
- Christmas tree ornament: Add a hanging loop and place Santa among your favorite decorations.
- Handmade gift: Attach him to a wrapped present as a reusable gift topper.
- Holiday centerpiece: Arrange several small Santas beside pine branches, candles, or other crochet ornaments.
- Stocking stuffer: Give one to a friend or family member who appreciates handmade gifts.
- Festive desk decoration: Place Santa on a shelf, desk, or windowsill during the holiday season.
You can even make a small collection with different hat colors, beard styles, and expressions.
Frequently Asked Questions
Is this mini crochet Santa pattern suitable for beginners?
Yes, it is designed for crocheters who already know basic stitches, increases, decreases, and sewing pieces together. Beginners may find smooth yarn easier to handle than fluffy chenille yarn.
How big will my finished crochet Santa be?
The finished size will depend on your yarn thickness, crochet hook, and tension. With suitable yarn and a small hook, you can aim for a Santa around 8–12 cm tall. Make a sample if you need a specific finished size.
Can I use velvet or chenille yarn?
Yes. These yarns create a soft, plush finish. However, the stitches can be harder to see, so use a stitch marker and count carefully. Smooth yarn is often easier for the face and smaller details.
How do I hang my crochet Santa on a Christmas tree?
Sew a secure loop of yarn through the top of the hat or head. Check that the loop and all attachments are strong enough to support the ornament.
Is this crochet Santa safe for young children?
Small amigurumi toys can present choking hazards. Safety eyes, pom-poms, and other small parts may come loose. For young children, use embroidered facial features and avoid detachable decorations. Follow applicable toy-safety requirements if you intend to sell the finished item as a toy.
Can I sell the finished crochet Santas?
That depends on the terms that apply to the pattern you use. If you make an original design, establish your own clear usage terms. If you adapt someone else’s pattern, check the designer’s permissions and licensing terms before selling finished items.
Final Thoughts
This mini crochet Santa is a lovely way to add a handmade touch to your Christmas decorations. With his red suit, fluffy beard, and little festive hat, he makes a charming addition to a holiday display or a thoughtful handmade gift.
Take your time with the assembly, keep your stitches neat, and experiment with different yarns and colors until you find a look you love. Once you have made one Santa, you may want to create a whole collection of tiny Christmas characters.
Happy crocheting, and enjoy making something special this Christmas!